
ACT! Database Export
It’s easy to export your ACT! database into a CSV (comma separated values) or Excel file so you can import all your contacts into the cloud-based ClientLook® CRM. Just follow the simple steps below.
NOTE: The examples shown contain sample screen shots from Sage ACT! 2012. If you have a different ACT! version, then there may be some slight differences. The same basic program flow should apply though.
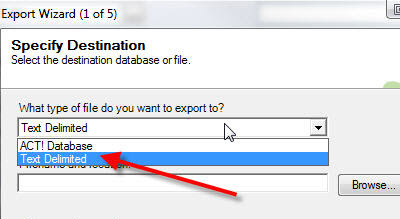
Step 1: Access the ACT! export wizard
Launch ACT! and open the database that you intend to export. Then follow the steps below.
- Within the “File” menu of your open ACT! database, choose “Export”. This will launch the ACT! Export Wizard.
- Choose “Text Delimited” as the file type to export to.
- Click the “Browse” button to choose a filename and folder.
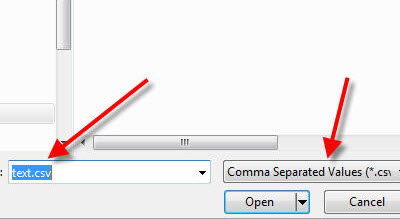
Step 2: Name your export file
In the popup that appears after clicking “Browse” in the step above, do the following:
- Select a destination folder on the left. This is where your file will be saved.
- Enter a name for your ACT! export file in the “File name” box.
- Lastly, choose “Comma separated values” from the picklist rather than the default “Text files”. Then, click “Open”.
- Click “Next” to proceed to the next step.
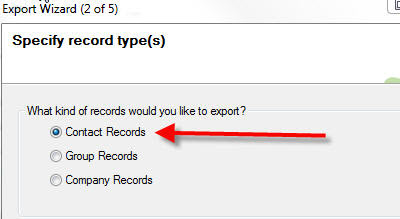
Step 3: Specify the ACT! records to export
Here, you need to:
- Select “Contact records” as the type of ACT! record to be exported.
- Then choose the “All records” option to export your entire ACT! contacts list.
- Click “Next” to proceed.
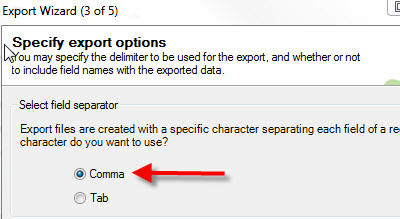
Step 4: ACT! export options
In this page choose the following ACT! export options:
- Select “Comma” separated data.
- Choose the “Export field names” option.
- Click “Next” to proceed.
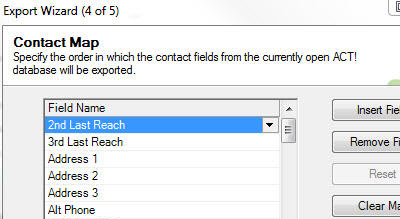
Step 5: ACT! contact field mapping
The last step involves choosing the fields of data that you wish to export. You should attempt to make your list as concise as possible. By default ACT! will default to automatically export all fields. Since your ACT! database may include dozens (or hundreds) of fields that you don’t need in ClientLook®, you should remove any unnecessary fields in this step.
PLEASE NOTE: You should export the “First Name”, “Middle Name” and “Last Name” fields from ACT!, not the combined “Contact” field – the ClientLook® import requires first and last names (and middle if desired) to be in separate columns on your spreadsheet.
- Review each field shown in the “Field Name” list.
- Click the “Remove Field” button to eliminate any fields that you do not wish to export. This has no affect on your existing ACT! database. It only affects the exported data.
- Once you have eliminated all unnecessary fields, click “Next” to proceed.
- On the final screen just click “Finish” and you’re done!
Time to import
Now that you have exported your ACT! database into a CSV file, you need to know how to import this file into ClientLook®. Simple instructions are available in our Import data video tutorial.